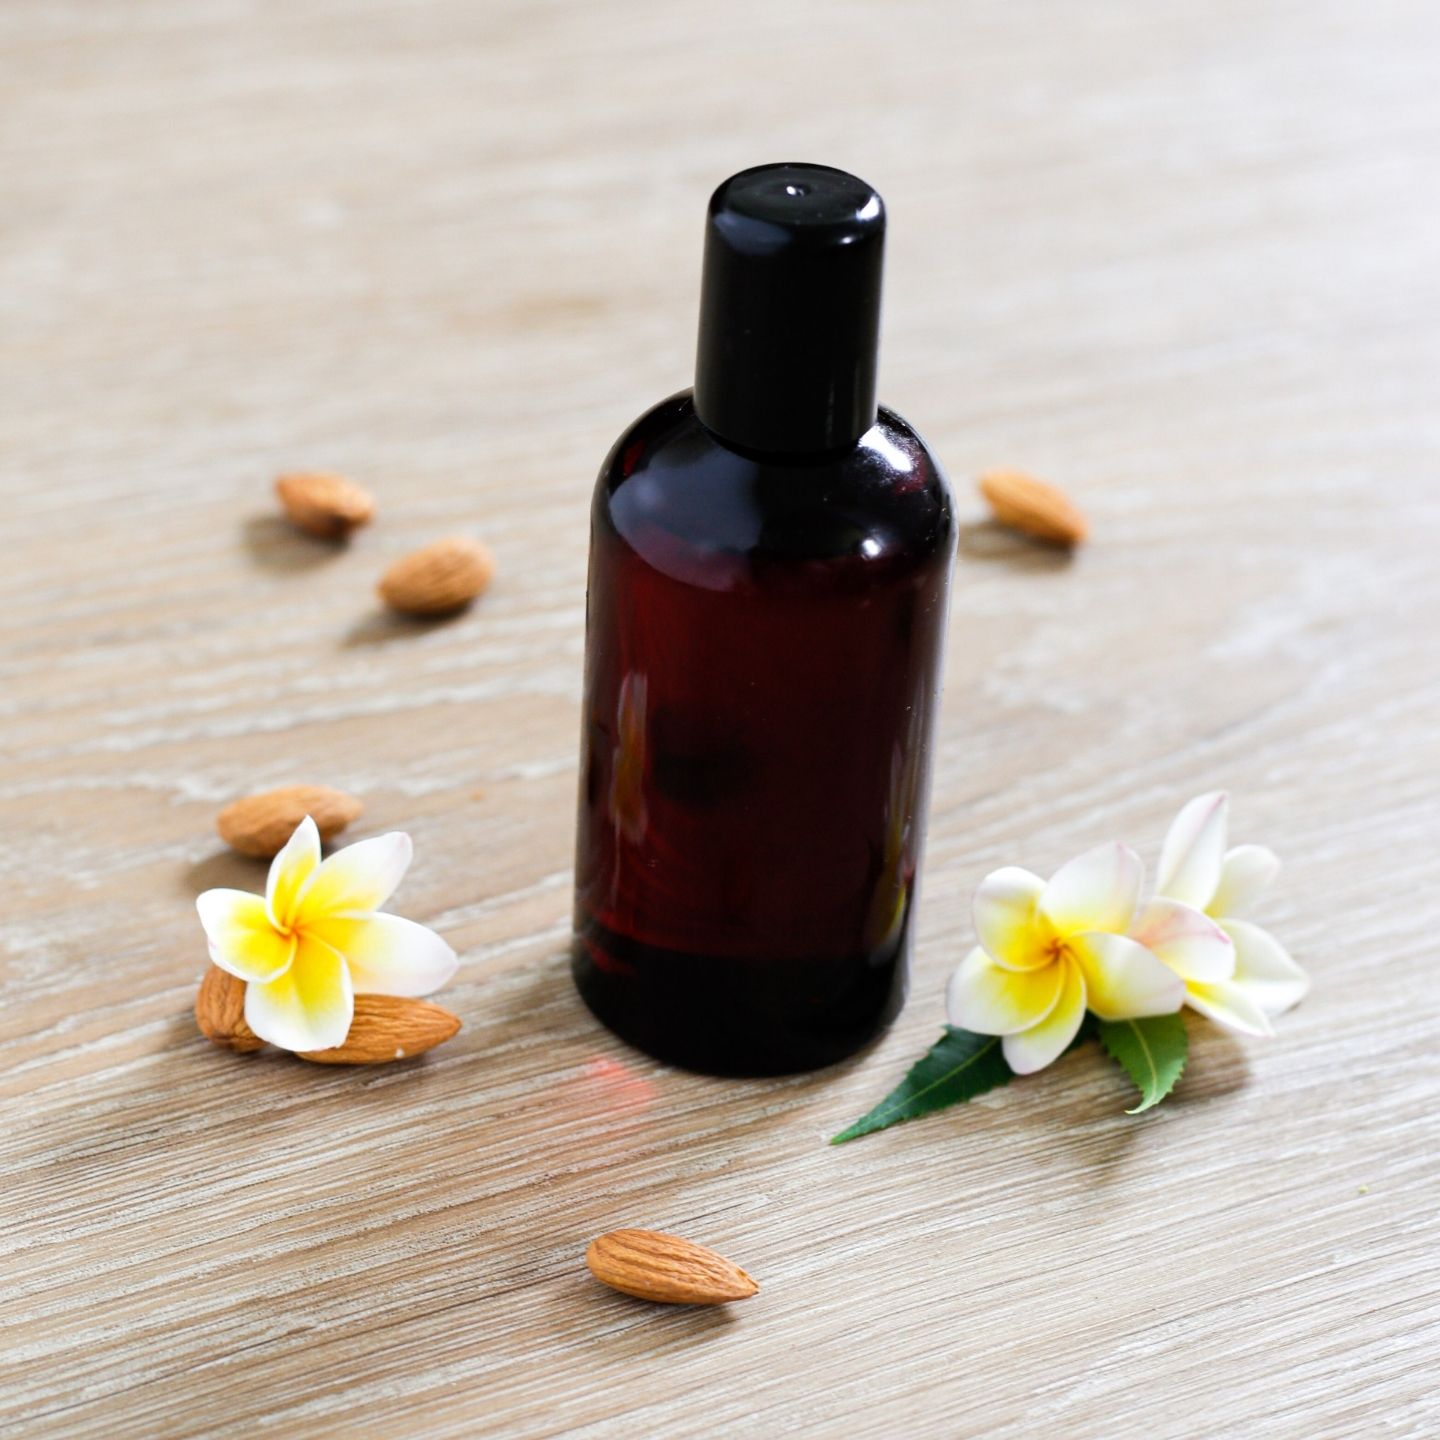
This DIY face serum is loaded with vitamin E, the perfect overnight anti-aging treatment to get rid of those fine lines and wrinkles, for younger-looking skin!
Vitamin E is an essential, fat-soluble vitamin, an antioxidant protecting cells from free radicals and the damaging effects due to excessive sun exposure. It also helps your cells to regenerate and has anti-inflammatory properties which come in handy on stressed, inflamed facial skin.
Contents
Making your own face serum is very simple. It only takes a couple of minutes to mix all the ingredients together! Sweet and easy. Everyone can do it!
I have been using pure vitamin E oil in my DIY products for some time now and absolutely love the effect it has on my skin! In this recipe, I additionally work with high-quality, therapeutic grade essential oils to promote healthy, glowing skin!
Ingredients
Affiliate Disclaimer: This article contains affiliate links. That means I may earn a small commission, if you purchase the linked product, at no extra cost for you.
- carrier oil(s)
- pure vitamin E oil
- essential oils (optional)
Carrier oils: vitamin E oil is quite a heavy and thick oil and therefore should be diluted with a carrier oil (which carrier oils you can use, read below). I work with a 1:10 (vitamin E oil to carrier oil) ratio but you could also double the amount of vitamin E (2:10 ratio).
Of course, there are some people who use vitamin E oil straight on their face without diluting it. Which is fine but I think your skin can only absorb as much and it would be a waste of this beautiful oil.
Pure vitamin E oil: you want to make sure to use pure vitamin E oil that isn’t mixed with any other ingredients.
Essential oils: they are simply a great addition to this homemade facial serum and support your skin in many, many ways (depending on which oils you choose.) I’ll list a few, with their benefits, below.
Carrier Oils
As we are making a serum with vitamin E, a carrier oil rich in this particular vitamin may be your first choice. However, keep in mind that not all skin types can use the same oils (see list below).
Another factor, from my personal experience, is that the climate/weather and season play a role in this as well. It’s important to check in with your skin from time to time and to change the oils whenever you need to.
How do you know this, you may ask? Trust me, you simply just know, without being extremely intuitive, or whatever.
You’ll notice that your skin changes (dryer or oilier, for example) or impurities may show up. The oils simply won’t work as well for you as they did before. That’s how you know.
If pimples are starting to cover your skin, stop using this serum or use the oils for oily, acne-prone skin instead (if you haven’t already.)
I usually use different oils whenever we turn from wet to dry season (I live in the subtropical North of Australia.) If you live in a moderate climate or somewhere with four seasons, you may not need to change the oils every time the season changes. Maybe just summer and winter.
Which carrier oil to use?
Affiliate Disclaimer: This article contains affiliate links. That means I may earn a small commission, if you purchase the linked product, at no extra cost for you.
Vitamin E rich oils: wheat germ oil, almond oil, apricot kernel oil and grapeseed oil.
For oily/acne-prone skin: dermatologists are still debating whether it’s beneficial or not to use oil on an oily and/or acne-prone face.
The ones against it say that it only contributes to more impurities. The ones pro say that it’s important to choose the right oils: lightweight, breathable and non-comedogenic (which means, it doesn’t clog your pores)!
You may want to try jojoba oil, hemp oil, rosehip oil or grapeseed oil.
For normal to dry skin: Coconut oil, olive oil (especially for dry skin), jojoba oil, wheat germ oil, almond oil, avocado oil, rosehip oil, apricot kernel oil, and grapeseed oil.
For sensitive skin: jojoba oil, avocado oil and apricot kernel oil.
Essential oils
In this DIY face serum, the use of essential oils is optional, but I highly recommend it. Some people prefer to use a fair bit whereas I’m a bit more cautious with my dosage.
Most people don’t react to essential oils, however, it’s always best to test the oils on a tiny bit of skin first (for more information about safety, read this). Even if you’re not allergic to any oil, you may find that using a high amount causes some kind of reaction or irritation on your skin.
Personally, I find, that when it comes to essential oils, less is sometimes more. This is why I always stick to this chart and only use a 0.5-2% dilution rather than a 5-10% (mind, a 10% dilution is still acceptable for daily use).
So, you choose! Try it out! Maybe start with a lower dilution first and then use 1-2% the next time to clearly see the difference for your skin. Mind, a 0.5% dilution is recommended for uses on the face!
- Anti-aging: geranium, frankincense, chamomile, helichrysum, carrot seed oil, rose and ylang-ylang.
- Fighting acne: cedarwood, lemongrass, tea tree, lavender, bergamot, grapefruit, eucalyptus, cypress and juniper berry.
- Glowing skin: lavender, sandalwood, helichrysum, jasmine and turmeric. Or have a look at my face serum for glowing skin recipe!
I use high quality, therapeutic grade essential oils such as doTERRA or Young Living. When it comes to essential oils, quality matters!!
WARNING! Don’t use any citrus oil in your serum when intending to use it in the morning. Citrus oils (lemon, orange, lime, bergamot and grapefruit) are phototoxic which means they react with the sun rays and could cause irritations! Mandarin, Tangerine and lemongrass are safe to use.
Instructions
How to make this DIY face serum with vitamin E
It’s so easy, you’ll be laughing! A pre-schooler could do it! Honestly. Well, there is one teeny-tiny “hard” part actually. And that would be: what oils to choose! Yup, that can be indeed quite challenging! So, this is how it goes.
- Step one: choose one (or more) carrier oil(s) according to your skin type. And, if using, your essential oil(s).
- Step two: if using essential oils, start with adding them to a small glass jar or bottle (see storage below) first. Then add vitamin E oil. And at last, top up with your carrier oil(s). Screw the lid and give it a good shake.
- Step three: Apply several drops (I usually use about 5-8) to your face, ideally before you go to bed.
How to use this DIY face serum with vitamin E
As just mentioned, ideally, you use it as a daily overnight treatment. However, you may like to also apply it in the morning.
If you also wish to use it throughout the day, just keep in mind that it might be harder to put on make-up or other facial creams or products.
When I apply this face serum, I always give my face a nice massage. Not only does this increase circulation and help your skin to absorb the oils better, but also relaxes your facial muscles.
In fact, I've been using a Gua Sha Massage Stone to do this very effectively. Gua Sha encourages lymph drainage, smoothes wrinkled skin and releases tensions.
We store a lot of tension in the face which can lead to wrinkles and fine lines. So, giving yourself a facial massage every night will refresh and lift your skin (no beauty doc needed, yay!)
Equipment & Storage
Now, you don’t really need anything special to make this DIY face serum with vitamin E. What you do need is a container, a jar or a bottle to store it in. Here are some ideas and options:
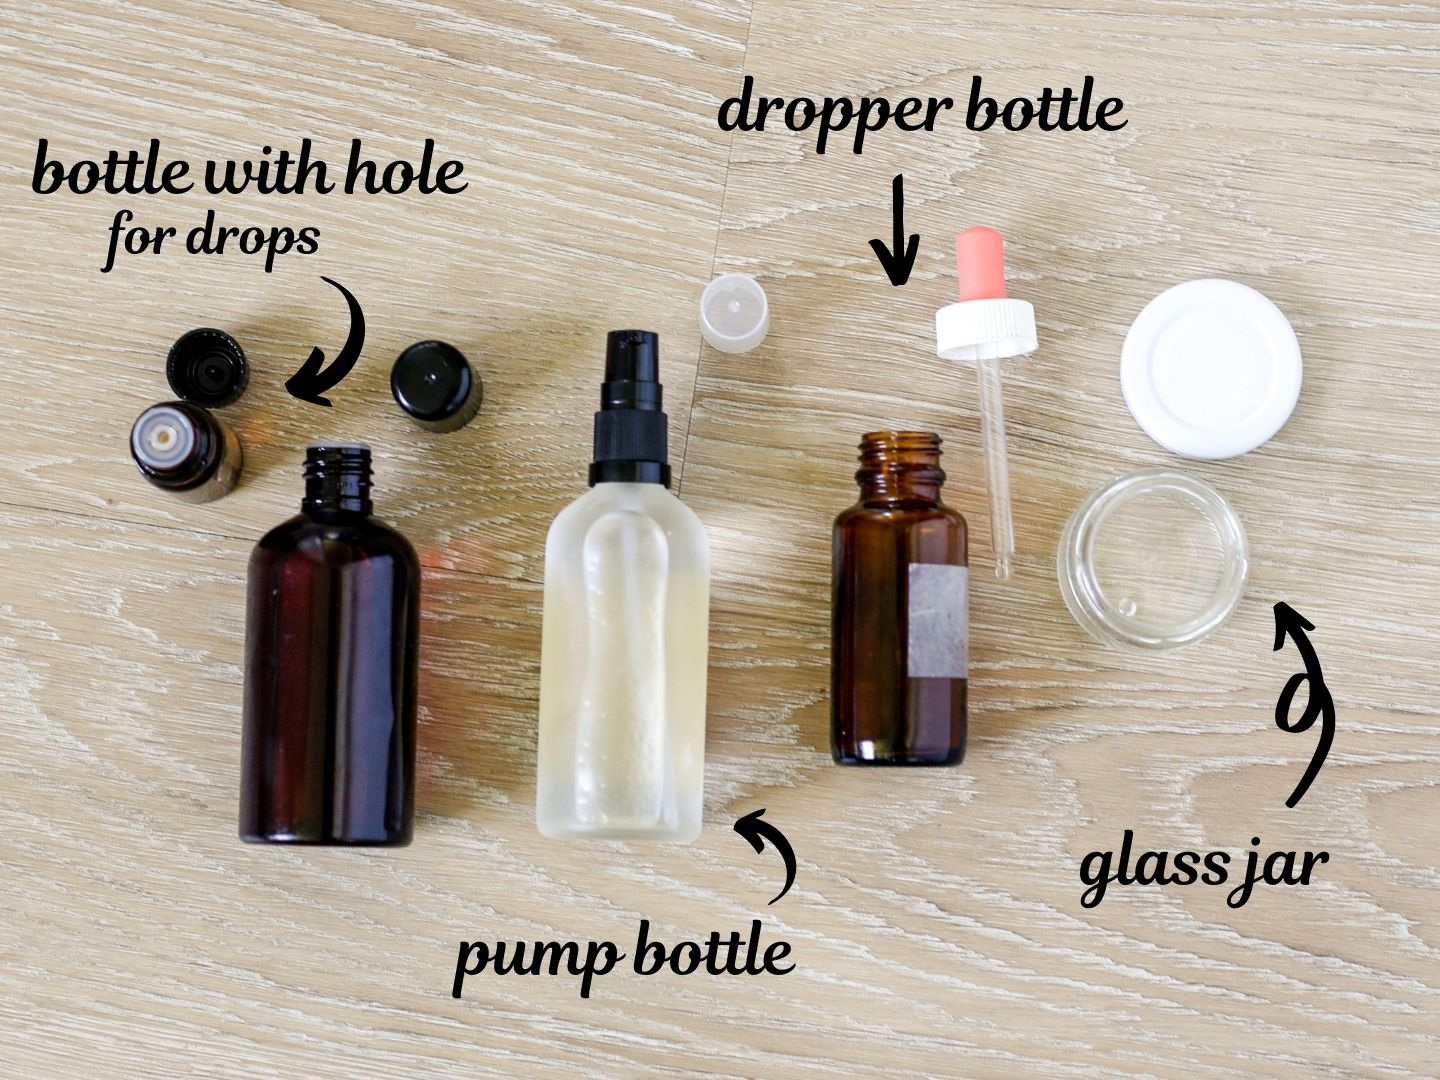
Ideally, you store your serum in a tinted or amber glass container/bottle to keep it out of direct light which can harm the essential oils.
Unless you store the face oil in your bathroom cupboard. Then it's fine to use a clear container.
- Option 1: Store in a small glass jar or a plastic container. Use a pipette/dropper, not your fingers, to get the serum out of the jar or container.
- Option 2: Reuse a small oil bottle that has a top with a tiny hole to drop the oil, one drop at a time, into your hands. If you’re with doTERRA, you can reuse their fractionated coconut oil bottle like I do!
- Option 3: Store in a dropper bottle (like one of these).
- Option 4: Store in a pump bottle (like one of these).
If you live in the US, you may want to check out SKS Bottle & Packaging. They have many different containers to choose from!
Store your serum in a cupboard, preferably out of the sun. As oils don't really spoil (or at least not that fast), you can keep the serum for up to 6-12 months.
However, essential oils may lose some of their amazing benefits and properties over time. It's therefore always better to make smaller batches.
Safety
Vitamin E or the carrier or essential oils may lead to breakouts and clogged pores. Stop using the serum if this occurs.
Always dilute vitamin E oil as well as essential oils with a carrier oil.
If any rashes or allergic reactions occur, stop using this DIY face serum with vitamin E or change the oils you’re using, making sure to test the new ones before applying.
If you take oral vitamin E supplements, make sure you’re not using more than the recommended daily dosage. Your skin may absorb the vitamin E in this serum through the skin and transport it to your bloodstream. Too much vitamin E can result in a reduced platelet count and blood thinning.
📖 Recipe
Equipment
- a 60ml/2oz. jar, container or bottle
Ingredients
- 1 teaspoon pure vitamin E oil
- about 60ml/2oz. carrier oil see notes
- 10-20 drops essential oil(s) optional, see notes
Instructions
- Add essential oil(s), if using, to a small jar, container or bottle. Top up with vitamin E and carrier oil.
- Give a little shake to mix all the oils.
- Store your serum in a cupboard, preferably out of the sun.
- Apply a few drops of the face serum to your face and massage it into your skin for about a minute (or longer!) This serum is a great overnight treatment and works well together with a Gua Sha Massage!
Leave a Reply